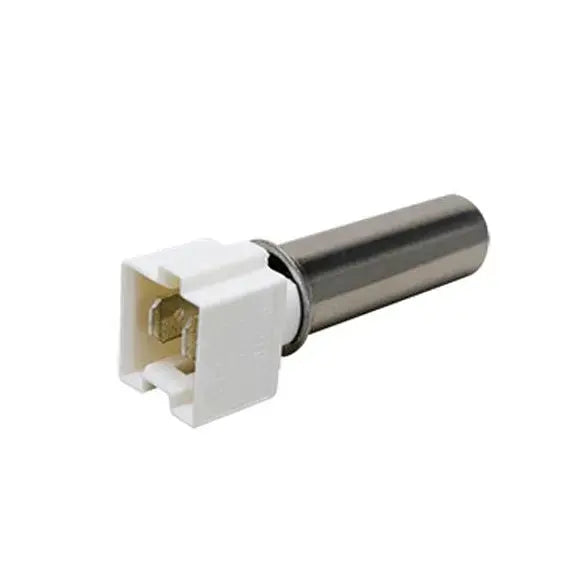
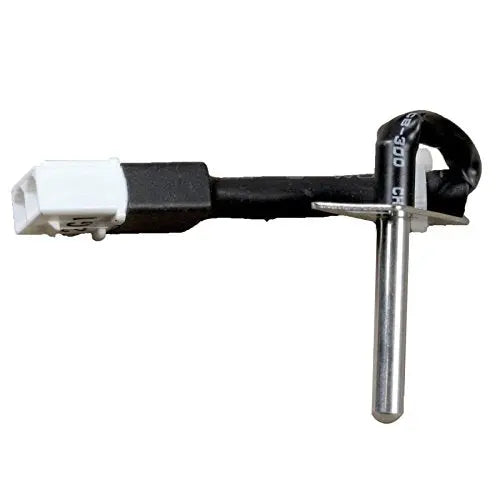
XPARTCO 6501KW2001A Washer Rotor Positioning Sensor – Compatible with LG and Kenmore Washers
Product Description
Restore accurate motor control and spin performance with the XPARTCO 6501KW2001A Washer Rotor Positioning Sensor. This Sensor Assembly, also known as a hall sensor is a replacement Part and is a vital component in Specific LG, Kenmore washer Models. This part monitors the direction and speed of the spinning rotor. It then communicates this information to the electronic control board. By doing so, it aids in the precise operation of your washer. If your washer pumps but fails to spin or agitate, it may be indicative of a damaged sensor assembly.
Replaces Part Numbers
6501KW2001A, 6501KW2001D, PD00001726, EAP2497738, 6501KW2001C, EBR37560301, AP4457567, PS3529185.
Compatibility
This replacement rotor positioning sensor fits select LG and Kenmore front-load washers.
Example compatible models include (but are not limited to): LG WM2101HW, LG WM2487HRM, and Kenmore 796.40272900.
Always verify your washer’s model number before ordering. Contact our support team if you’re unsure.
✅ Key Features
🔄 Aftermarket Replacement – Designed to match OEM performance and accuracy
⚙️ Precise Motor Feedback – Helps control drum rotation and spin speed
💰 Cost-Effective Solution – High-quality alternative to OEM sensor assembly
🛠️ Easy Installation – Plug-and-play design with secure connector fit
🛡️ Fixes Common Issues – Resolves LE, UE, or spin-related error codes
📐 Product Specification
Part Number: 6501KW2001A
Component Type: Washer Rotor Position Sensor (Hall Sensor)
Material: High-durability circuit board and plastic housing
Mounting: Direct-fit replacement on motor stator assembly
Operating Conditions: Designed for high-humidity washer environments
Compliance: Built to OEM-equivalent quality standards (not OEM)
🛠️ Installation Notes
Tools Needed: 10mm socket wrench, Phillips screwdriver
⚠️ Safety First: Always unplug the washer before performing any repairs to prevent electrical shock.
Steps:
Disconnect power and remove the rear access panel.
Remove the rotor bolt and pull off the rotor assembly.
Locate and disconnect the wiring harness from the old sensor.
Remove the old 6501KW2001A sensor and install the new XPARTCO replacement.
Reconnect wiring, reinstall the rotor, and secure the rear panel.
Restore power and run a spin test to verify repair.
⏱️ Time Required: 20–25 minutes
📦 Shop With Confidence
🚚 Free Shipping on All Orders
⚙️ Trusted Appliance Parts Supplier
🔄 30-Day Return Policy
Fix washer spin and motor issues — Add to Cart Now for a reliable, budget-friendly repair!
XPARTCO 6501KW2002B Washer Rotor Position Sensor – Compatible with LG and Kenmore Washers
Product Description
Maintain smooth spin cycles and precise motor control with the XPARTCO 6501KW2002B Washer Rotor Position Sensor. This Sensor Assembly, also known as a hall sensor is a replacement Part and is a vital component in Specific LG, Kenmore washer Models. This part monitors the direction and speed of the spinning rotor. It then communicates this information to the electronic control board. By doing so, it aids in the precise operation of your washer. If your washer pumps but fails to spin or agitate, it may be indicative of a damaged sensor assembly.
Replaces Part Numbers
6501KW2002B, 6501KW2002A, AP7015078, PD00073205, EAP16556422, 4962510, PS16556422, EAP16556422.
Compatibility
This replacement rotor position sensor fits select LG and Kenmore front-load washers.
Example compatible models include (but are not limited to): LG WM2487HRM, LG WM0642HW, and Kenmore 796.40272900.
Always verify your washer’s model number before ordering. Contact our support team if you’re unsure.
Key Features
Aftermarket Replacement – Designed to match OEM performance and precision
Accurate Rotor Feedback – Helps regulate motor speed and direction for smooth washing
Cost-Effective Fix – Delivers OEM-level performance at a fraction of the price
Plug-and-Play Installation – No wiring modification required
Fixes Common Issues – Resolves LE, UE, SE, and spin cycle errors
Product Specification
Part Number: 6501KW2002B
Component Type: Washer Rotor Position Sensor (Hall Sensor)
Material: Durable printed circuit board with reinforced plastic housing
Mounting: Direct-fit installation on stator assembly
Operating Conditions: Rated for high-humidity, high-vibration washer environments
Compliance: Built to OEM-equivalent quality standards (not OEM)
Installation Notes
Tools Needed: 10 mm socket wrench, Phillips screwdriver
⚠️ Safety First: Always unplug the washer before performing repairs to prevent electrical shock.
Steps:
Disconnect power and remove the rear access panel.
Unscrew the rotor bolt and carefully remove the rotor assembly.
Locate and unplug the old sensor from the stator.
Install the new XPARTCO 6501KW2002B sensor, aligning mounting tabs.
Reconnect the wiring harness, reinstall the rotor, and secure the panel.
Restore power and run a spin test to verify correct operation.
⏱️ Time Required: 20–25 minutes
Shop With Confidence
Trusted Appliance Parts Supplier
30-Day Return Policy
Restore precise washer performance — Add to Cart Now for a reliable, budget-friendly repair!
W10467289 Washer Genuine OEM Temperature Sensor
Replaces Part Numbers: WPW10467289, W10467289, 2629420, 8181705, 8182291, 8540225, 8540226, W10176658, W10176659, OEM18065663, AP6021886,, PS11755214.
Description: This Water Temperature Sensor is a Genuine OEM part for specific Kenmore, Whirlpool washing machine models. This sensor ensures the water is reaching the proper temperature at each stage of the wash cycle.
California Residents only
WARNING: Cancer and/or Reproductive Harm - www.p65warnings.ca.gov
XPARTCO WL49X20360 Washer Motor Speed Sensor Kit – Compatible with GE & Hotpoint Washers
Product Description
Restore accurate motor speed detection and reliable washer operation with the XPARTCO WL49X20360 Washer Motor Speed Sensor Kit. This high-quality aftermarket replacement kit monitors the washer motor’s rotation speed and sends feedback to the control board for proper agitation and spin performance. A faulty speed sensor can cause error codes, no spin, irregular agitation, or cycle interruptions. Replacing it with this XPARTCO kit helps restore smooth operation and consistent wash cycles.
XPARTCO is a trusted aftermarket brand offering appliance replacement parts built to OEM-equivalent specifications at a cost-effective price.
Replaces Part Numbers
WL49X20360, WH12X10515, 3031241, PD00025952, EAP8768455, AP5803767, PS8768455.
Compatibility
This replacement washer motor speed sensor kit fits select GE and Hotpoint washers.
Example compatible models include (but are not limited to):
GE GTW465ASNWW, GTW485ASJWS
Hotpoint HTW240ASKWS
Always verify your washer’s model number before ordering.Contact our support team if you’re unsure.
✅ Key Features
🔄 Aftermarket Replacement Kit – Matches OEM fit and signal performance
⚙️ Accurate Motor Speed Feedback – Ensures proper agitation and spin control
🛠️ Direct-Fit Design – No modifications required
💪 Durable Electronic Components – Built for long-term reliability
💰 Cost-Effective Repair – Reliable alternative to OEM sensor kits
📐 Product Specification
Part Number: XPWL49X20360
Component Type: Washer Motor Speed Sensor Kit
Function: Motor rotation and speed detection
Application: Washer drive motor feedback system
Includes: Speed sensor and mounting hardware (as applicable)
Quality Level: Aftermarket replacement (not OEM)
🛠️ Installation Notes
Tools Needed: Phillips screwdriver, nut driver
⚠️ Safety First: Unplug the washer before servicing to avoid electrical shock.
Basic Steps:
Disconnect washer power.
Access the motor area from the bottom or rear of the washer.
Locate and disconnect the old motor speed sensor.
Remove mounting hardware and replace with the new XPARTCO WL49X20360 sensor.
Reconnect wiring and secure the sensor.
Reassemble panels, restore power, and run a test cycle.
⏱️ Time Required: 20–30 minutes
📦 Shop With Confidence
🚚 Free Shipping on All Orders
⚙️ Trusted Aftermarket Appliance Parts
🔄 30-Day Return Policy
Restore accurate washer motor control and dependable performance — Add to Cart Now for a reliable, budget-friendly repair!
W11126005CM Dishwasher Wash Vane Sensor
Description: This Sensor is a replacement component specifically designed for certain Whirlpool dishwasher models. It plays a crucial role in monitoring cycle conditions like temperature and soil levels to automatically customize wash sequences. Causes of a bad sensor can include leaking or faulty wiring disrupting signals over time, mineral buildup gumming internal mechanisms, or damage from impact.
Replaces Part Numbers: W11126005, W11503875, W10380177, W10380483, W10647239, AP6261394, PS12114437.
This is an aftermarket part that can be used as a replacement for the OEM part.
California Residents only
WARNING: California’s Proposition 65
WD21X25468 Genuine OEM GE Dishwasher Pressure Sensor Assembly
The WD21X25468 is a Genuine OEM GE replacement dishwasher pressure sensor assembly compatible with a wide range of GE, GE Profile, GE Café, Hotpoint, Haier, and Monogram dishwashers in the GDF, GDT, GDP, PDT, CDT, ZDT, QDP, and HDF series. The pressure sensor monitors water pressure inside the dishwasher tub during fill and drain cycles and sends real-time readings to the electronic control board. The control board uses these readings to calculate the correct amount of water needed for each wash cycle and to confirm that the tub has drained properly before advancing to the next cycle phase.
When the pressure sensor fails — or when it becomes clogged with grease, food residue, or mineral buildup — the dishwasher may not fill with water, may overfill, may stop mid-cycle, may fail to drain correctly, or may display error codes H2O or FTD (Failure to Drain). This Genuine OEM part is manufactured by GE to factory specifications. It directly replaces AP6976524, PS12741258, EAP12741258, 4962334, 37640602, and 265D3356P001. Sold individually. Installs in 15–20 minutes — a screwdriver is the only tool required for most models.
Quick Answer
The WD21X25468 Genuine OEM GE Dishwasher Pressure Sensor Assembly fixes GE dishwashers displaying error codes H2O or FTD (Failure to Drain), not filling with water, overfilling, stopping mid-cycle, or running excessive noise from the spray arms. Monitors water level and pressure — signals the control board to fill, wash, and drain correctly. Genuine OEM. Replaces AP6976524, PS12741258, EAP12741258, 4962334, 37640602, 265D3356P001. Sold individually. Compatible with GE GDF, GDT, PDT, CDT, ZDT, QDP, HDF, and related series.
Common Problems This Part Fixes
Error code H2O displayed — dishwasher not receiving enough water or no water at all
Error code FTD (Failure to Drain) displayed — sensor not confirming tub has drained
Dishwasher not filling with water when a cycle is started
Dishwasher overfilling — sensor not signaling the control board to stop filling
Dishwasher stopping mid-cycle without completing the wash
Excessive noise during operation — sensor not accurately controlling spray arm water pressure
Dishwasher requires priming with water to start (filling the tub manually before it will run)
Replaces Part Numbers
This pressure sensor directly replaces the following OEM and cross-reference part numbers:
WD21X25468, 265D3356P001, AGE24772, AP6976524, EAP12741258, OEM20929581, PD00067609, PS12741258.
Contact our support team with your model number if you need confirmation before ordering.
Compatibility
This pressure sensor is compatible with a wide range of dishwashers from the following GE product lines:
GE dishwashers — GDF450, GDF510, GDF511, GDF535, GDF550, GDF565, GDF570, GDF630, GDF640, GDF645 series
GE dishwashers — GDT530, GDT535, GDT565, GDT580, GDT605, GDT625, GDT630, GDT635, GDT645, GDT695 series
GE dishwashers — GDP615, GDP645, GDP665 series
GE Profile dishwashers — PDT715, PDT775, PDT785 series
GE Café dishwashers — CDT800, CDT875 series
GE Monogram dishwashers — ZDT800, ZDT870, ZDT925, ZDT985 series
Hotpoint dishwashers — HDF310, HDF330 series
Haier dishwashers (select GE-platform models)
GE / Café / Profile — QDP555 series
Always verify your appliance model number before ordering. Contact our support team if you're unsure.
Key Features
Genuine OEM part manufactured by GE to factory specifications — guaranteed fit and performance
Monitors water pressure inside the tub throughout fill and drain cycles — signals the control board to fill to the correct level and confirm complete drainage
Resolves H2O and FTD error codes on compatible GE dishwashers
Sensor can also fail due to grease or mineral buildup blocking the pressure port — cleaning may resolve the issue without replacement
Replaces AP6976524, PS12741258, EAP12741258, 4962334, 37640602, and 265D3356P001
Compatible with GE GDF, GDT, GDP, PDT, CDT, ZDT, QDP, HDF, and Hotpoint dishwasher series
Sold individually
Quick DIY repair — installs in 15–20 minutes with a screwdriver
Product Specifications
Part Number
WD21X25468
Part Type
Dishwasher Pressure Sensor Assembly (Pressure Switch)
Condition
Genuine OEM
Application
GE, GE Profile, GE Café, GE Monogram, Hotpoint, Haier Dishwashers
Function
Monitors tub water level and pressure — signals control board for fill and drain control
Error Codes Resolved
H2O (no/low water), FTD (Failure to Drain)
Sold As
Single sensor assembly
Compatible Brands
GE, GE Profile, GE Café, GE Monogram, Hotpoint, Haier
Installation Notes
⚠️ Unplug Dishwasher and Shut Off Water Before Starting Disconnect power and shut off the water supply before beginning. On most compatible GE models, the pressure sensor is located near the bottom of the dishwasher tub, accessible after removing the lower front kick panel (secured by one or two screws). The sensor assembly connects to a small hose and a wiring harness connector. Tip: before replacing the sensor, remove it and inspect the pressure port and hose for grease, food residue, or mineral buildup — a clogged sensor port can cause H2O and FTD errors without the sensor itself being electrically failed. Clean the port and hose with warm water and a small brush, reinstall, and test the dishwasher. If the error codes persist after cleaning, replace the WD21X25468 sensor. To replace: disconnect the hose and wiring harness from the old sensor, unclip or unscrew the sensor from its mounting bracket, and install the new sensor in the same position. Reconnect the hose and harness, restore power and water, and run a test cycle. Tools needed: Phillips screwdriver.
Frequently Asked Questions
What does the dishwasher pressure sensor do?
The pressure sensor monitors the water pressure — and therefore the water level — inside the dishwasher tub throughout the wash cycle. It sends continuous readings to the electronic control board, which uses the data to determine how much water to add during fill, when to stop filling, and whether the tub has drained completely before advancing to the next cycle phase. An accurate pressure sensor is essential for the dishwasher to fill to the correct level (not too much, not too little), wash with the correct spray arm pressure, and drain fully before moving on to rinse or dry cycles.
What do error codes H2O and FTD mean on GE dishwashers?
H2O error code on compatible GE dishwashers indicates that the dishwasher is not detecting enough water in the tub — either water is not filling at all, or the pressure sensor is not sensing the water that has filled. FTD (Failure to Drain) code indicates the dishwasher has not confirmed that the tub has drained within the expected time. Both codes can be caused by a faulty pressure sensor, a clogged sensor port, a failed fill valve, a blocked drain system, or control board issues. The pressure sensor should be inspected and tested first since it is the most accessible and commonly replaced component for these two error codes.
Should I try cleaning the sensor before replacing it?
Yes — absolutely. The pressure sensor on GE dishwashers can produce H2O and FTD error codes when its pressure port or connected hose becomes clogged with grease, food residue, or hard water mineral deposits — even if the sensor itself is electrically intact. Before ordering a replacement, remove the sensor, inspect the pressure port opening, and clean it thoroughly with warm water and a small brush. Flush the connected hose to clear any buildup. Reinstall and run a test cycle. If the error codes return, the sensor has electrically failed and needs replacement with the WD21X25468.
My dishwasher won't fill unless I pour water in manually first — is this the pressure sensor?
Yes — this is a classic symptom of a clogged or failed pressure sensor. When the sensor port is blocked, the sensor reads zero pressure (empty tub) even when the dishwasher starts. In some cases the control board interprets this as a drainage confirmation and will not initiate the fill cycle. Pouring water into the filter manually raises the physical water level enough to trigger filling. Check and clean the sensor port as described above. If cleaning does not resolve the issue, replace the WD21X25468 sensor.
Is this a Genuine OEM or aftermarket part?
This is a Genuine OEM part manufactured by GE to factory specifications. It is the exact same pressure sensor assembly installed in compatible GE, GE Profile, GE Café, Hotpoint, and related brand dishwashers from the factory — guaranteed fit, materials, and performance.
Shop With Confidence
A U.S.-based appliance parts retailer specializing in genuine OEM and high-quality replacement parts. We stock components for all major appliance brands and offer fast shipping from our U.S. warehouse. Our team is available to help verify compatibility before you purchase.
✓ Genuine OEM Parts ✓ Fast US Shipping ✓ Compatibility Support ✓ Secure Checkout
WH22X37840 Genuine OEM GE Washer Main Control Board
The WH22X37840 is a genuine GE OEM main control board for GE and Profile UltraFresh front-load washers. This board is the washer's central processor — it reads every button press and cycle selection, drives the motor and inverter, opens and closes the water valves, runs the drain pump, and continuously monitors water level through an integrated water pressure switch built into the board itself. Because so many functions route through this single board, a failing control board can produce almost any symptom: a washer that won't power on, won't start a cycle, stalls partway through, fails to fill or drain, or runs a cycle that doesn't match what was selected on the display.
This board revises and supersedes WH22X36637, and also replaces WH22X29532, WH22X30898, WH22X32057, WH22X32457, WH22X34659, WH22X35517, WH22X36857, and WH22X37839. As a genuine OEM part, the WH22X37840 is manufactured by GE to factory specifications — guaranteed fit, materials, and performance. Important: this board is not universal across GE's front-load lineup. It must be matched to your specific model and, after installation, programmed with the correct "personality" code for your washer before it will operate properly.
Quick Answer
The WH22X37840 Genuine OEM GE Washer Main Control Board fixes GE and Profile UltraFresh front-load washers that won't power on, won't start, stall mid-cycle, fail to fill or drain, run the wrong cycle, or have an unresponsive control panel. Genuine OEM, includes an integrated water pressure switch. Revises WH22X36637; also replaces WH22X29532, WH22X30898, WH22X32057, WH22X32457, WH22X34659, WH22X35517, WH22X36857, WH22X37839. Fits GFW650S, GFW850S, PFW870S, and PFW950S platforms. Requires programming a model-specific "personality" code after install, and the drain pump must be confirmed good before installing — a failed pump can damage a new board.
Common Problems This Part Fixes
Washer won't power on or the display stays completely dark
Washer won't start a cycle even though buttons respond and lights come on
Cycle stalls or stops partway through with no error explanation
Washer won't fill with water, or fills but never advances to wash
Washer won't drain or won't spin at the end of a cycle
Control panel unresponsive — button presses do nothing, or the wrong cycle runs
Display shows scrambled characters, flashing LEDs, or a persistent error code
Washer runs erratically — random starts, stops, or cycle changes on its own
Board that failed after repeated cycles where the drain pump was struggling
Cross Reference Information
Part numbers can change over a product's lifecycle as manufacturers update designs or release new appliance models. For your convenience, we've included any known superseded, alternate, or cross-reference part numbers that match this item.
Replaces Part Numbers
This washer main control board directly replaces the following OEM and cross-reference part numbers:
WH22X37840, WH22X36637, WH22X35517, WH22X34659, WH22X30898, WH22X29532, WH22X32057, WH22X32457, WH22X36857, WH22X37839, AP7245609, AGE26864, PD00089582, PS17874601.
WH22X36637 was the immediately preceding number that GE revised to WH22X37840. If your part number is not listed above, contact our support team before ordering and we will verify compatibility.
Compatibility
This main control board is compatible with select GE and Profile UltraFresh front-load washers, including:
GE front-load washers — GFW650S series
GE front-load washers — GFW850S series
GE Profile front-load washers — PFW870S series
GE Profile front-load washers — PFW950S series
Verified model numbers include: GFW650SPN0SN, GFW650SPN1SN, GFW650SPN3SN, GFW650SPN4SN, GFW650SSN4WW, and PFW955SPW0DS.
Note: This board only works for the specific GE and Profile models listed above and must be programmed with the correct personality code for your washer after installation. It is NOT a universal front-load control board. If your model number is not listed above, ordering this board is likely to result in a board that installs but never runs correctly. Always verify your full model number before ordering, and contact our support team with your model number if you're unsure.
Key Features
Genuine GE OEM part — factory-specified firmware, relay switching, and sensor interface
Functions as the washer's central processor, coordinating the motor, inverter, water valves, and drain pump
Includes an integrated water pressure switch — not available or serviceable as a separate part
Resolves "won't power on," "won't start," "stalls mid-cycle," "won't fill or drain," and "unresponsive control panel" symptoms caused by control board failure
Revises and directly replaces WH22X36637 and 7 additional legacy board numbers
Direct drop-in replacement for the original board mounting and harness connectors
Fits GFW650S, GFW850S, PFW870S, and PFW950S GE and Profile UltraFresh platforms
Genuine OEM replacement — guaranteed fit, materials, and performance
Product Specifications
Part Number
WH22X37840
Part Type
Washer Main Control Board (Electronic Control Module)
Condition
Genuine OEM
Brand
GE / GE Profile
Application
GE and Profile UltraFresh Front-Load Washers
Integrated Components
Water pressure switch (built into board, not separately serviceable)
Programming Required
Yes — model-specific personality code must be set after installation
Supersedes
WH22X36637
Repair Difficulty
Medium — top panel removal and electrical connections required
Quantity
1 control board
Compatible Models
GFW650S, GFW850S, PFW870S, PFW950S series
Installation Notes
⚠️ 240V Circuit — Unplug Washer Before Starting. Verify Drain Pump First. Board Requires Programming. Disconnect power at the outlet or shut off the circuit breaker before beginning; front-load washers on this platform run on a 120V/240V circuit and internal components can retain a charge briefly after power is removed. Before replacing the board, confirm the drain pump is working correctly. A drain pump that has been struggling, clogged, or intermittently failing can send the control board erratic electrical feedback that damages a brand-new board the same way it damaged the old one — replacing the board alone, without checking the pump, is one of the most common reasons a "new" board fails again within days. Access is typically through the top panel: remove the rear top screws and slide the panel back, then locate the control board housing (commonly behind the top-front console or in a housing near the top of the cabinet, depending on model). Photograph all harness connections before disconnecting anything — this board has numerous connectors and getting even one out of place will cause a no-start or miswired symptom. Ground yourself before handling the board to avoid static damage to its electronics. Remove the mounting screws, disconnect each harness connector, and lift the old board free. Install the new WH22X37840 in the same orientation, reconnect every harness connector exactly as photographed, and secure the mounting screws. Before closing the washer back up, you must program the board with the personality code specific to your model. This is done through a button sequence on the control panel — press and release Start repeatedly until the display shows the personality ID number for your model, then confirm to save it; the control will return to an idle state once accepted. GE's official instructions (publication 99-3000289) detail the exact sequence and a Field Service Mode test if the LEDs don't flash correctly after programming — follow those instructions rather than guessing at the code, since an incorrect personality setting will cause the washer to behave unpredictably. Once programmed, reassemble the top panel, restore power, and run a full test cycle to confirm normal fill, wash, drain, and spin behavior. Tools needed: Phillips screwdriver, nut driver, anti-static wrist strap (recommended), and access to GE's personality programming instructions for your model.
Frequently Asked Questions
Do I really need to program the board after installing it?
Yes — this is not optional. The WH22X37840 is shared across several GE and Profile washer models, and it needs to be told which specific model it's installed in through a "personality" code before it will run correctly. Skipping this step, or entering the wrong code, will leave the washer behaving unpredictably even though the board itself is functioning normally. GE provides official programming instructions (publication 99-3000289) with the button sequence for your model — follow those closely rather than guessing.
Why does the listing say to check the drain pump before installing this board?
Because on this platform, a failing or clogged drain pump can feed electrical strain back into the control board that damages it over time — the same failure that likely killed your original board. If you install a new board without addressing a bad drain pump, there's a real risk of burning out the replacement as well. Before installing, run the pump through a diagnostic or physically inspect it for clogs, a seized impeller, or electrical failure, and address any issues found there first.
My washer won't power on at all. Is this the right part?
It's a strong candidate, but rule out the obvious first: confirm the outlet has power, check that the washer's power cord and connection are intact, and check the home's circuit breaker or a blown fuse. If those are all fine and the washer still shows zero signs of life — no lights, no display, no response to any button — the main control board has very likely failed and this board is the correct replacement.
What's the difference between WH22X37840 and WH22X36637?
They are the same board across production revisions. WH22X36637 was the prior GE part number and WH22X37840 is the current number that supersedes it. If your washer's parts diagram shows WH22X36637 or any of the older numbers (WH22X29532, WH22X30898, WH22X32057, WH22X32457, WH22X34659, WH22X35517), this listing is the correct replacement — it installs and programs the same way.
Does this board include the water pressure switch?
Yes. The water pressure switch that monitors fill level is integrated directly into this control board and is not available as a separate part per GE. If your washer's issue turns out to be water-level detection specifically — overfilling, underfilling, or an error related to water level — this board is the correct and only OEM fix, since the pressure switch cannot be replaced on its own.
Is this an OEM or aftermarket part?
This is a genuine OEM part, manufactured by GE to factory specifications — guaranteed fit, materials, and performance. It carries the same firmware, relay switching, integrated water pressure switch, and harness layout as the control board originally installed in your washer, and it is the officially supported replacement for your model once the correct personality code is programmed.
Shop With Confidence
A U.S.-based appliance parts retailer specializing in genuine OEM and high-quality replacement parts. We stock components for all major appliance brands and offer fast shipping from our U.S. warehouse. Our team is available to help verify compatibility before you purchase.
✓ Genuine OEM Parts ✓ Fast US Shipping ✓ Compatibility Support ✓ Secure Checkout
6322FR2046CCM Washer Thermistor Assembly
Monitors water temperature Fits LG and Kenmore Washer
Replaces Part Numbers:6322FR2046C, 6322FR2046B, 1268202, 6322FR2046F, 6322FR2046W, AH3528953, EA3528953, AP4445159, PS3528953.
Description: This Thermistor Assembly is a replacement part for select front loading LG washing machine models. It plays an important role in monitoring and regulating temperatures during heated wash cycles. The thermistor detects temperature changes within the wash drum and sends this information to the control board to ensure clothes are washed at the optimal temperature.
This is an aftermarket part that can be used as a replacement for the OEM part.
XPARTCO 17438200000160 Gas Dryer Flame Switch
The XPARTCO 17438200000160 is an aftermarket replacement gas dryer flame switch compatible with select Midea, Insignia gas dryers, including the MLG45N1BWW, MLG45N3BMG, MLG45N3BWW, MLG52S7AWW, CDG41N1AW/CDG45N1AW series, NSDRE67WH8A, NSFDRG67WH8A, NSDRE67WH8AC, NSTDRG75W1. The flame switch is a safety component mounted on the burner assembly that confirms a flame is actually present after the gas valve opens and the igniter lights the burner. If the switch does not detect a flame within the expected window, it signals the control board to shut off the gas valve, preventing unburned gas from continuing to flow into the dryer cabinet.
When the flame switch fails, the dryer may not heat at all, may shut off the burner shortly after ignition (short-cycling the flame), may trip a no-heat fault code on models with digital displays, or — in rarer failure modes — may fail to shut off gas flow appropriately, which is a safety-relevant failure. It directly replaces 17438200000160 (Midea OEM). Installs in 30–45 minutes with basic hand tools.
Quick Answer
The XPARTCO 17438200000160 Gas Dryer Flame Switch fixes Midea gas dryers that won't heat, where the burner lights and then shuts off shortly after ignition, or where a no-heat fault is displayed. Mounted on the burner assembly — confirms flame presence after ignition and signals the control board to keep the gas valve open. Genuine Midea OEM part number. Compatible with Midea MLG45N1BWW, MLG45N3BMG, MLG45N3BWW, MLG52S7AWW, CDG41N1AW, and CDG45N1AW gas dryers.
Common Problems This Part Fixes
Gas dryer not heating — flame switch not confirming flame presence to the control board
Burner lights briefly and then shuts off — flame switch failing to maintain the "flame confirmed" signal
No-heat fault code displayed on models with digital control panels
Dryer runs and tumbles normally but produces no heat
Burner repeatedly cycling on and off rapidly during a heat cycle
Visible damage, corrosion, or carbon buildup on the flame switch near the burner
Replaces Part Numbers
This flame switch directly replaces the following part number:
17438200000160, AP7153000, PS18188577.
This is the Midea, Insignia manufacturer part number used across multiple Midea gas dryer models. Contact our support team with your model number if you need confirmation before ordering.
Compatibility
This flame switch is compatible with select Midea, Insignia gas dryers, including:
Midea MLG45N1BWW gas dryer
Midea MLG45N3BMG gas dryer
Midea MLG45N3BWW gas dryer
Midea MLG52S7AWW gas dryer (8.0 cu. ft. front load)
Midea CDG41N1AW gas dryer (Criterion, air vent)
Midea CDG45N1AW gas dryer (Criterion, air vent)
Always verify your appliance model number before ordering. Contact our support team if you're unsure.
Key Features
Confirms flame presence at the burner after ignition and signals the control board accordingly
Safety component — helps ensure the gas valve closes promptly if a flame is not detected
Mounts directly to the burner assembly in the same position as the original switch
Genuine Midea manufacturer part number — designed as a direct fit for compatible models
Compatible with Midea MLG45N1BWW, MLG45N3BMG, MLG45N3BWW, MLG52S7AWW, CDG41N1AW, and CDG45N1AW gas dryers
Installs in 30–45 minutes with basic hand tools
Product Specifications
Part Number
XP17438200000160
Part Type
Gas Dryer Flame Switch
Condition
Aftermarket Replacement
Application
Gas Dryers (Midea platform)
Location
Mounted on the burner assembly
Compatible Brands
Midea
Installation Notes
⚠️ Gas Appliance Safety Warning This part is installed in a gas dryer. Always unplug the dryer and shut off the gas supply at the shutoff valve before beginning any repair. If you smell gas at any point during or after installation, leave the area immediately and contact your gas utility provider. Do not restore power or gas until the repair is fully complete and all connections are confirmed secure. If you are not comfortable working on gas appliances or safety-relevant flame-detection components, have this part installed by a qualified technician.
⚠️ Wear Work Gloves — Access Requires Cabinet Disassembly Disconnect power and shut off gas before beginning. Wear work gloves throughout — there are sharp metal edges inside the dryer cabinet. Remove the lint filter and the screws securing the lint filter housing. Release the top panel locking clips with a putty knife and lift the top panel. Disconnect the door switch harness and remove the front panel to access the drum and burner assembly. Locate the flame switch mounted on the burner assembly — it is positioned to detect the flame produced once the igniter lights the gas. Photograph the wire connections before disconnecting. Disconnect the wires from the old flame switch, remove the mounting screw, and pull the switch free. Install the new 17438200000160 flame switch in the same position, secure the mounting screw, and reconnect the wires. Reassemble the front panel, drum, and top panel in reverse order. Restore gas and power, and run a test heat cycle to confirm the burner ignites and stays lit normally. Tools needed: Phillips screwdriver, putty knife, work gloves.
Frequently Asked Questions
What does the flame switch do, and how is it different from an igniter?
The igniter is the component that heats up and ignites the gas at the burner. The flame switch is a separate safety component that confirms a flame is actually present after the igniter has done its job and the gas valve has opened. If the flame switch does not detect the expected flame condition, it signals the control system to close the gas valve, stopping gas flow. This two-part system — ignition plus flame confirmation — is a standard safety design in gas dryers and gas appliances generally, ensuring gas does not continue flowing if combustion isn't actually occurring.
My burner lights and then shuts off after a few seconds — is this the flame switch?
Yes, this is a common symptom of a failing flame switch. If the switch is not reliably maintaining its "flame detected" signal to the control board even though the burner is genuinely lit, the system may interpret this as a flame failure and shut the gas valve as a safety precaution — causing the burner to repeatedly light and then extinguish. This short-cycling pattern during what should be a continuous heat cycle is a strong indicator that the flame switch needs replacement.
Why is this called a "flame switch" rather than a "flame sensor"?
Different manufacturers use different terminology for similar flame-detection safety components. On Whirlpool-family gas dryers, this type of part is typically called a "flame sensor" — a bimetal-style sensor near the igniter that closes a circuit when it senses sufficient heat. Midea's parts catalog labels this specific component the "flame switch," and it serves an analogous safety role within the Midea gas burner system: confirming the presence of a flame after ignition. The terminology differs by manufacturer, but the safety function is similar in concept.
Why does this repair require opening the whole dryer cabinet?
On Midea gas dryers, the flame switch is mounted directly on the burner assembly inside the dryer cabinet, which is only accessible after removing the lint filter housing, releasing the top panel, and removing the front panel. This is a more involved repair than swapping an externally accessible part, but it follows the same general gas dryer disassembly procedure used for replacing igniters, thermal fuses, and other burner-area components. Since the cabinet must be opened, it can be a good opportunity to inspect other burner components (igniter, gas valve coils) for wear at the same time.
Is this an OEM or aftermarket part?
This is an aftermarket replacement part built to OEM-equivalent quality standards. It is manufactured to match the dimensions, mounting configuration, and function of the original 17438200000160 Midea flame switch.
Shop With Confidence
A U.S.-based appliance parts retailer specializing in genuine OEM and high-quality replacement parts. We stock components for all major appliance brands and offer fast shipping from our U.S. warehouse. Our team is available to help verify compatibility before you purchase.
✓ Fast US Shipping ✓ Quality Aftermarket Parts ✓ Compatibility Support ✓ Secure Checkout
17438200000404 Genuine OEM Midea Dryer Temperature Sensor (Thermistor)
The 17438200000404 is a Genuine OEM Midea replacement dryer temperature sensor (thermistor) compatible with an extensive range of Midea, Criterion, and Insignia electric and gas dryers. This NTC (negative temperature coefficient) thermistor continuously monitors air temperature inside the dryer and sends resistance-based readings to the control board, which uses this data to regulate heating element cycling, prevent overheating, and maintain consistent drying temperatures throughout the cycle. As the thermistor heats up, its electrical resistance decreases in a predictable way, allowing the control board to calculate the exact temperature in real time.
When this sensor fails — whether shorted, open, or providing drifted/inaccurate readings — the dryer may overheat, may not heat at all, may dry clothes unevenly, may take much longer than normal to complete a cycle, or may trigger a not-heating fault on models with digital displays. As a Genuine OEM part manufactured by Midea to factory specifications, the 17438200000404 directly replaces WF-123X2060 (an alternate catalog cross-reference used by some suppliers, including for compatible Maytag-branded Midea-built units). Installs in 20–30 minutes with basic hand tools.
Quick Answer
The 17438200000404 Genuine OEM Midea Dryer Temperature Sensor (Thermistor) fixes Midea, Criterion, and Insignia dryers that are overheating, not heating, drying unevenly, or taking too long to dry. NTC thermistor — resistance drops as temperature rises; ~10,000–12,000 ohms at room temperature (70°F). Genuine OEM. Replaces WF-123X2060. Compatible with Midea MLE41N1AWW, MLE45N1AWW/BWW, MLE45N3BMG/BWW, MLE52N3AWW, MLE52S7AGS/AWW, MLG45N1AWW/BWW, MLG45N3BMG/BWW, MLG52S7AGS/AWW, Criterion CDE41N1AW/CDG41N1AW, and a wide range of Insignia models.
Common Problems This Part Fixes
Dryer overheating — thermistor not accurately reporting rising temperature to the control board
Dryer not heating at all — thermistor circuit open or shorted
Dryer drying clothes unevenly — inconsistent temperature regulation during the cycle
Dryer taking much longer than normal to complete a cycle
Not-heating fault code displayed on models with digital control panels
Multimeter test shows 0 ohms (shorted) or infinite resistance (open) instead of the expected NTC reading
Dryer cycling heat on and off erratically
Replaces Part Numbers
This temperature sensor directly replaces the following OEM and cross-reference part numbers:
17438200000404, WF-123X2060, AP7157538, PS18188581
Contact our support team with your model number if you need confirmation before ordering.
Compatibility
This temperature sensor is compatible with an extensive range of Midea, Criterion, and Insignia dryers, including:
Midea electric dryers — MLE41N1AWW, MLE41N1AWWC, MLE45N1AWW, MLE45N1BWW, MLE45N1BWWC, MLE45N3BMG, MLE45N3BWW, MLE52N3AWW, MLE52S7AGS, MLE52S7AWW
Midea gas dryers — MLG45N1AWW, MLG45N1BWW, MLG45N3BMG, MLG45N3BWW, MLG52S7AGS, MLG52S7AWW
Midea — CLADE67W, MDD160A2301E1305, MDD160VG012F0110EUS13
Criterion — CDE41N1AW (electric), CDG41N1AW (gas)
Insignia electric dryers — NSDRE67WH8A, NSDRE67WH8AC, NSFDRE67WH8A, NSFDRE67WH8AC, NSFDRE77WH8B, NSFDRE77WH8BC, NSTDRE67W1, NSTDRE75W1
Insignia gas dryers — NSFDRG67WH8A, NSTDRG67W1, NSTDRG75W1
Always verify your appliance model number before ordering. Contact our support team if you're unsure.
Key Features
Genuine OEM part manufactured by Midea to factory specifications — guaranteed fit and performance
NTC (negative temperature coefficient) thermistor — resistance decreases predictably as temperature rises, allowing precise temperature monitoring
Sends real-time temperature data to the control board to regulate heating element cycling and prevent overheating
Approximately 10,000–12,000 ohms of resistance at room temperature (around 70°F) when functioning correctly
Compatible across both electric and gas Midea-platform dryers, including Criterion and Insignia house-brand models
Replaces WF-123X2060
Installs in 20–30 minutes with basic hand tools
Product Specifications
Part Number
17438200000404
Part Type
Dryer Temperature Sensor (NTC Thermistor)
Condition
Genuine OEM
Application
Electric and Gas Dryers (Midea platform)
Sensor Type
NTC (Negative Temperature Coefficient)
Resistance at Room Temp
Approximately 10,000 – 12,000 ohms (~70°F)
Location
Blower housing/exhaust duct or drum cavity, depending on model
Compatible Brands
Midea, Criterion, Insignia
Installation Notes
⚠️ Unplug Dryer Before Starting (Shut Off Gas First on Gas Models) Disconnect power before beginning (and shut off the gas supply first if you have a gas dryer model). Midea dryers typically have 2–3 temperature sensors: an exhaust thermistor on the blower housing or exhaust duct, a drum thermistor inside the drum cavity, and on heat pump models, an evaporator thermistor — confirm which sensor location matches your symptom and part diagram before starting. Access the sensors by removing the back panel on vented models, or the side/bottom panels on heat pump models. Photograph the connector position before disconnecting. Unplug the old sensor's connector and inspect it for corrosion or heat discoloration on the wires — discoloration indicates prior overheating in that area. Remove the mounting clip or screw securing the old sensor and pull it free. Install the new 17438200000404 sensor in the same position, reseat the connector firmly, and secure the mounting hardware. Reassemble the panel, restore power, and run a test heat cycle to confirm normal temperature regulation. Tools needed: Phillips screwdriver, multimeter (for testing).
Frequently Asked Questions
How do I test if the temperature sensor (thermistor) has failed?
Unplug the dryer, disconnect the sensor's connector, and set your multimeter to resistance mode. At room temperature (around 70°F), a working NTC thermistor should read approximately 10,000 to 12,000 ohms. If the sensor reads 0 ohms, it has shorted internally. If it reads infinite resistance (open circuit, often shown as "OL" on the multimeter), the sensor has failed open. Either reading confirms the sensor needs replacement. If you have multiple sensors testing bad at the same time, check the shared ground wire — a broken ground connection can cause all sensors on that circuit to read as open even if the individual sensors are fine.
My Midea dryer has more than one temperature sensor — how do I know which one to replace?
Midea dryers typically use 2–3 temperature sensors depending on the model: an exhaust thermistor mounted on the blower housing or exhaust duct, a drum thermistor inside the drum cavity, and — on heat pump/ventless models — an evaporator thermistor in the refrigerant circuit area. The 17438200000404 is used across this Midea/Criterion/Insignia platform, but confirming the exact mounting location for your specific symptom (e.g., overheating vs. uneven drying) and model number before ordering will help ensure you're replacing the correct sensor.
What is the difference between 17438200000404 and WF-123X2060?
These are the same temperature sensor. WF-123X2060 is an alternate catalog cross-reference number used by some parts suppliers for the identical Midea-manufactured thermistor — it appears in listings for compatible Maytag-branded Midea-built units as well as the standard Midea, Criterion, and Insignia models. If your dryer's parts diagram shows either number, the 17438200000404 is the correct part.
Does this sensor fit my Insignia or Criterion dryer?
Yes — Insignia (Best Buy) and Criterion (Sears/Kmart) are house brands whose dryers in this size and configuration are manufactured by Midea and use the same internal components, including this temperature sensor. Confirmed compatible models include Insignia NSDRE67WH8A, NSFDRE67WH8A, NSFDRE77WH8B, NSTDRE67W1, NSTDRE75W1 (electric) and NSFDRG67WH8A, NSTDRG67W1, NSTDRG75W1 (gas), as well as Criterion CDE41N1AW (electric) and CDG41N1AW (gas). Always verify your specific model number before ordering.
Is this a Genuine OEM or aftermarket part?
This is a Genuine OEM part manufactured by Midea to factory specifications. It is the exact same NTC thermistor temperature sensor installed in compatible Midea, Criterion, and Insignia dryers from the factory — guaranteed fit, materials, and performance.
Shop With Confidence
A U.S.-based appliance parts retailer specializing in genuine OEM and high-quality replacement parts. We stock components for all major appliance brands and offer fast shipping from our U.S. warehouse. Our team is available to help verify compatibility before you purchase.
✓ Genuine OEM Parts ✓ Fast US Shipping ✓ Compatibility Support ✓ Secure Checkout
Major HomeAppliance Parts Repair, replace, and restore your home appliances with genuine OEM and quality aftermarket parts for refrigerators, washers, dryers, dishwashers, ovens, ranges, cooktops, microwaves, and more. When something breaks, you need the right part — fast. We stock thousands of genuine OEM and quality aftermarket parts for every...
Read more